Self-provisioning is a feature in CUCM 10 which allows users to add phones with minimal effort. The general idea would be to use this function to automate the addition the typical employee phone. It creates an IVR that a user can call into, enter their “subscriber ID” and a PIN (if desired) and add a new or additional phones to the system. (It also allows a user to provision the phone via a Idle URL app if desired.) It is similar in functionality to TAPS, but does not require CCX to implement. More information can be found here.
I decided to build a lab utilizing this feature and PLAR (private-line auto ringdown — a way to have a phone automatically call a certain number as soon as it is taken off-hook) to make it as easy as possible to add a new phone.The basic steps being:
- Administrator assigns an extension to the user via Active Directory/LDAP.
- User is synced to CUCM.
- User gets a new phone out of the box and plugs it in.
- It auto-registers to CUCM with an extension set to PLAR to the self-provisioning IVR.
- When the user goes off-hook it calls the IVR, they enter their assigned extension and the phone reboots with their personalized configuration.
- The first component is to configure self-provisioning, the associated universal device/line templates, user templates and IVR settings.
- The second component is PLAR, it’s partitions, CSS auto-registration pool and auto-registration universal device/line templates.
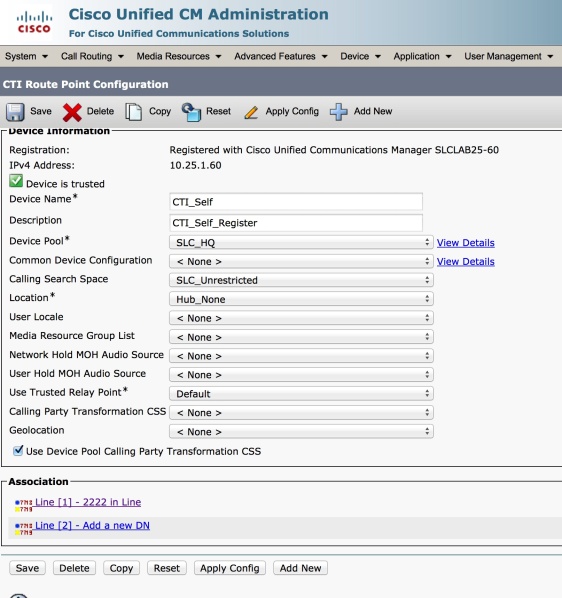
1) Create a CTI Route-point and assign an extension that’s in an accessible partition (typically the internal Line partition)

2) Create a self-provisioning application user that has the CTI route-point assigned as a controlled device. Add it to the Standard CTI Enabled group.
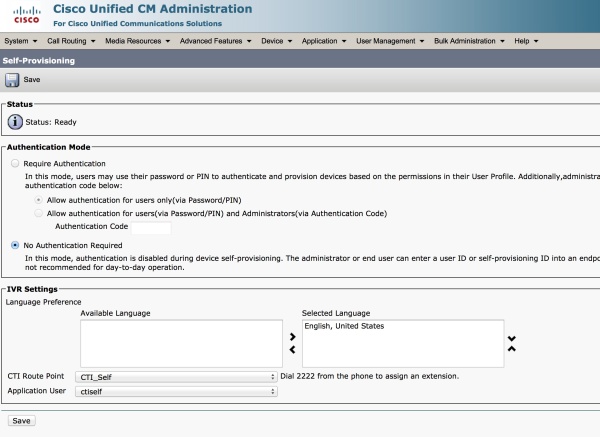
3) Under User-management | Self-provisioning select the authenticathion method (I set mine to No Auth to make it very easy to add a phone, requiring the PIN is likely the best way to deploy this in production. However the challenge with that is there is no way to sync the PIN from LDAP, you can just set a default in CUCM to assign users, or manually edit this after the user is synced over.)

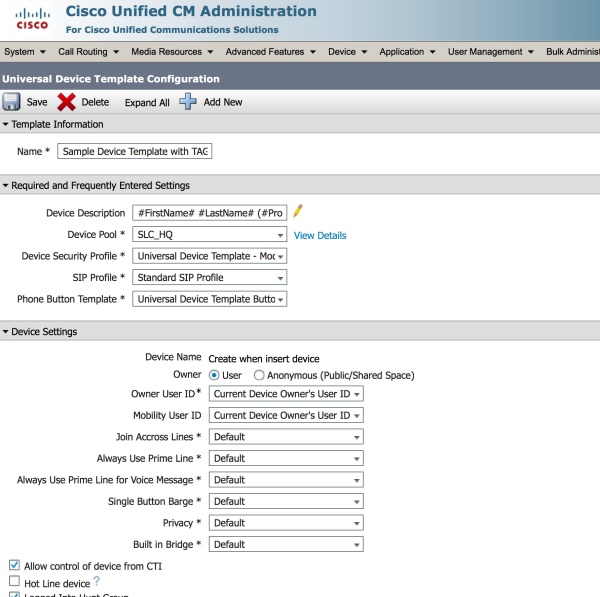
4a) Under User Management | User/Phone Add | Universal Device Template load the Sample Device Template with TAG usage examples and edit the settings that you want customized for a phone that is added. Things that you’ll typically want to change would be the Device Pool, CSS, Subscribe CSS, Softkey template, Phone button template, etc. to match the settings that you want a typical phone to have.

4b) Create additional Universal Device Templates for other types/configurations of phones that you want to allow to be self-provisioned. For a multi-site deployment where device pools need to be unique, you will need to create one for each device pool.
5) Likewise, Under User Management | User/Phone Add | Universal Line Template load the Sample Line Template with TAG usage examples. Edit settings like the Partition and anything unique to the phones.
5b) You may need to create additional Universal Line Templates for other configurations of phones that you want to allow to be self-provisioned.
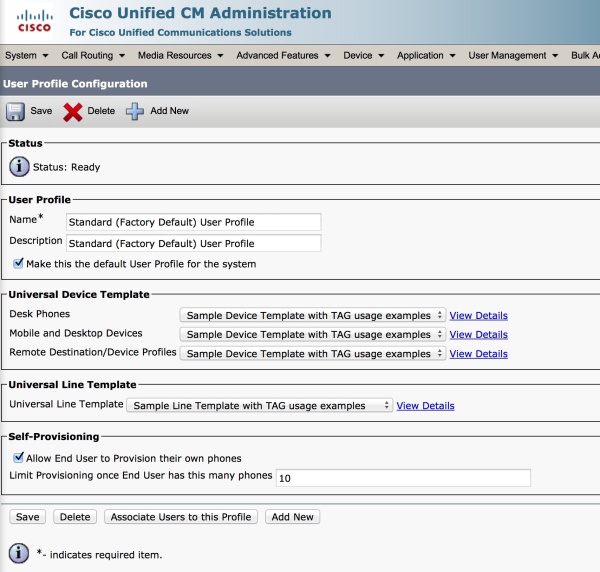
6) Under User Management | User Management | User Profile load the Standard (Factory Default) User Profile and modify the name to reflect the phone model, device pool, etc. For example, HQ-8945-User Profile. Assign the appropriate Universal Device and Line Templates, and check the box to allow self-provisioning.

6b) Create any other User Profiles needed for other sites, and select the approprate UDT/ULTs for those profiles
7) (Optional for automated CUP/Jabber setup) Under User Management | User Phone/Add | Feature Group Template specify the User Profile and Service Profile (which specifies the CUP server settings).
8) Add a user in LDAP, making sure to specify the IPPhone or Telephone number field that you use for the extension and sync the user to CUCM, (or alternately create a local user making sure to assign a Self-service User ID and Telephone Numer) to test self provisoning.
When the user is synced, the Self-service User ID will automatically be synced to the field that you sync the phone number from (typically IPPhone or Telephone Number).
Modify the User Profile if it needs to be different from the default (for a user who is at a different location or who has a different phone type/service as discussed above).
9) Activate the Self-provisioning IVR service in CCM Serviceability
10) Test by calling the Self-provisioning IVR from a phone that you’ve plugged in. The IVR should answer, you’ll enter the extension (Self-service User ID), confirm, and the phone will reboot with the new configuration.
If the IVR responds with an error that the phone cannot be provisioned check that the user has a Self-service User ID, and that the User Profile is specified.
Configuring Auto-registration with PLAR
Using auto-registration with PLAR will enable the phone to auto-register to CUCM with a dummy extension in a PLAR parition/CSS and automatically call the IVR when it goes off-hook. This way the new user doesn’t have to know the self-provisioning IVR extension.
Information about configuring PLAR can be found here, but I’ll include the summary steps below:
1) Create a PLAR1 partition, and a PLAR CSS that has only the PLAR1 partition in it
2a) For SCCP phones: Create a blank (or null) Translation Pattern whose CSS can see the internal Line partition that the self-provisioning IVR CTI Route Point is in. Typcially this is an Internal CSS or Restricted CSS. Set the Called Party Transformation Mask to the extension of the IVR. This essentially sets it up so that any phone that has the PLAR CSS, when it goes off-hook, will hit this null xlate and get told to dial the self-provisoning IVR.
2b) For SIP phones (9900 series, etc.) you must create a SIP Dial Rule (found under Call Routing > Dial Rules > SIP Dial Rules) to accomplish the same thing as the Translation Patten did for the SCCP phones above. Add a new rule, the Dial Pattern is 7940_7960_Other, call it PLAR1, and add the IVR extension in the Pattern Description field.
3) As we did above, create a new Universal Device Template and call it Auto-registration Device Template. In the Device Routing section select PLAR1 in the SIP Dial Rules field, and PLAR_CSS in the Calling Search Space field. Any new device that is auto-registered will now be set to PLAR to the IVR.
3b) Remove the IDLE URL from the Universal Device Template if you don’t want the user using the application on the phone’s screen to self-provision. I found it preferable to use the IVR and PLAR.
4) As we did above, create a new Universal Line Template and call it Auto-registration Line Template. Set the Route Partition to PLAR1 and CSS to PLAR_CSS.
5) Under System | Cisco Unified CM, select the CallManager server that you want to use for auto-registration. Select the Auto-registration Device Template, and the Auto-registration Line Template under the Appropriate UDT/ULT fields. Give it a range of dummy extensions to register to, and make sure the Auto-registration Disabled on this Cisco Unified Communications Manager checkbox is not selected.
Now when phones auto-register they will pickup the PLAR UDT/ULT settings and automatically call the IVR when the go off-hook. After the user enters their extension the phone will reboot with the new settings.
Credit to Michael White for publishing this on his blog.
http://ciscocollab.wordpress.com/page/3/